 |
| Altered teacup for Alice in Wonderland swap |
I've never done anything like this before, so I was a little nervous (okay, maybe a lot nervous) about whether I could come up with anything that would do justice to all the goodies they sent me to work with.
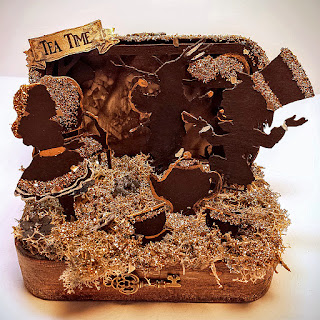
I hope that they like what I came up with. I did two projects, each using the altoid tins they sent. I started with this one, which I'm calling Alice's Memories, because I was thinking of her toward the end of her life, maybe as a great grandmother, remembering her adventures fondly.
 |
| Alice's Memories |
 |
| Alice's Memories -- a different angle (I'm not the greatest photographer, and getting good pictures of this was really, really hard for me. It is definitely cuter in person.) |
 |
| Alice's Memories -- Outside of tin |
I started by painting the tin a cream color, then when it was dry, used a dry brush to add a some light brown acrylic paint, then painted on a layer of DecoArt's One Step Crackle. Once that was dry, I went back with some darker brown and rubbed it into the crackled parts to make it look aged. I glued a few images to the outside of the lid, and added a couple of tiny keys for more embellishment.
For the inside, I painted the chipboard figures and chipboard props black, then added white, gold, and glitter highlights. The background in the lid of the tin is from a scrap of some photorealistic scrapbook paper I had. I used two of the chipboard frames from this set (the mushrooms in the back, the Cheshire cat in front of that) painted black and glittered, separated by pop dots so they'd stand out more. I glued crumpled tissue paper inside the base, glued some moss over that, and then decided where to place the figures and glued them in place. On a few of the figures, I cut a toothpick in half and glued to the back and stuck that down into the moss/tissue paper to help give more stability. Finally, I dabbed some watered down glue around the moss and sprinkled glitter over the whole thing.
For my second project, I knew I wanted to do an assemblage doll piece. I've been looking at all kinds of different dolls and figures on Pinterest lately, and I just really, really wanted to try one.
 |
| Alice Doll, front |
 |
| Alice Doll, front, closeup |
 |
| Alice Doll, inside -- it says "It's a friend of mine, a Cheshire Cat," said Alice. |
 |
| Alice doll, inside -- the court scene for the background, with tarts and cake for decoration |
I was picturing it as a wall hanging at first, although I wasn't quite sure what I was going to do for legs, but I was talking to a friend, tossing around ideas, and started thinking about putting her on a candlestick or something so she could sit on a shelf. I wasn't quite sure exactly what I was going to do, but then I was walking through Tuesday Morning, and they had these adorable little dessert bowl type dishes -- a small bowl on a pedestal, not very tall, and I thought it would make a perfect base, resembling a skirt or dress. So I picked up one of those, and then found some Tattered Angels Plain Jane's Stained Glass paint over on the craft aisle (still at Tuesday Morning):
 |
| Glass dessert dish and Plain Jane's Stained Glass Paint for creating her base |
I painted the inside of the bowl with two coats (the picture there shows it after one coat) and then used some Metallic Lustre on the outside to bring out the raised design and to make the edge look gold.
For the head, I used one of the images from one of the collage sheets Alpha Stamps sent me and created a soldered square, then glued a bit of embellishment (I think it was part of an earring maybe?) in one corner. I used a bead for the neck. The wire heart was originally going to be for hanging her on a wall, until I changed direction, but it helps provide stability for the head and neck, so I just decorated it with some of the little plastic flower beads they sent me and added the "Alice's Adventures in Wonderland" graphic from one of the collage sheets.
For the tin, I painted it, then decorated the outside with some 7 Gypsies rub ons. I used some images from the collage sheets on the inside of the tin, along with one of these chipboard frames that I painted black and then edged with the gold Metallic Lustre. I used the resin heart tarts and miniature chocolate cake to decorate the deeper (normally bottom) side of the tin. The lid side has a scrap of Graphic 45 paper for the background, and then the picture, the quote, and the top hat are cut from different collage sheets, and I used this bronze stop watch.
I punched holes in the tin to attach her arms, which are some little glass flower beads I had in my stash, wire wrapped together, ending in a bronze teacup and saucer charm on one arm, and a flat, round, bronze piece for a saucer on the other. On the bottom of the flat, round piece, I glued a magnet so it would stick to the tin, and then used some velcro, one piece on the top of that flat round piece and one piece on the bottom of the teacup and saucer charm, so that they stick together when she's closed, but can be easily moved so you can open the tin.
I finished her up by making her crepe paper skirt, highlighting some of the edges with the Metallic Lustre, and used some paper flowers from my stash to cover the edges of the crepe paper on the front, and a metal decorative piece to cover it on the back, because it was kind of messy looking. Here she is from the back:
 |
| Alice Doll -- back |
So, those are the two projects I came up with. I actually have an idea for using some of the other collage sheet images they sent me, I just haven't had time to work on it yet. I really appreciate Alpha Stamps for letting me do this -- I had a lot of fun with it, despite being a bit nervous about it.

Love it.Wish I could be there. You did an awesome job
ReplyDeleteThanks, Christie!
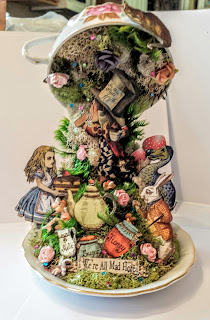
DeleteHi Shannon! Welcome to Alpha Stamps!! Your work is so fun. Where are you located? Maybe for those who can't attend your class of Alice's Teacup you might think about how to offer the instructions online. I sure would love to know how you made it suspend like that!! So very cool!!! Looking forward to seeing more of your work. Don't be nervous. Breathe and have fun. xo
ReplyDeleteHi, Sheila, I'm in Texas, in the Dallas area. I'll think about putting instructions online sometime. I'm glad you like it! Thanks!
Delete