Pages

Wednesday, June 1, 2016

Alpha Stamps Guest Designer!

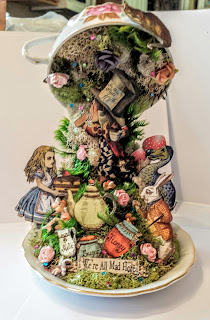
So, a while back, I made this teacup for an Alice in Wonderland swap with some friends (I posted about that here):


Alice in Wonderland altered upside down inverted teacup and saucer
Altered teacup for Alice in Wonderland swap

So, my friends really liked it and asked if I'd teach a class on how to do it (which is happening this Saturday, 6/4/2016, if local folks want to sign up). I thought that sounded like fun, so I contacted Alpha Stamps, where I got the images I used, to find out what I needed to do to be able to use those images in class, and included a picture of the teacup. Apparently, they liked it, and asked me if I'd like to be a guest designer for the month of May, when they'd be featuring Alice in Wonderland items.

I've never done anything like this before, so I was a little nervous (okay, maybe a lot nervous) about whether I could come up with anything that would do justice to all the goodies they sent me to work with.

Too many goodies to fit in one picture, really, but you get the general idea -- lots of collage sheets, a couple of altoid tins, chipboard figures and frames, beads, flowers, resin and metal embellishments.
I hope that they like what I came up with. I did two projects, each using the altoid tins they sent. I started with this one, which I'm calling Alice's Memories, because I was thinking of her toward the end of her life, maybe as a great grandmother, remembering her adventures fondly.
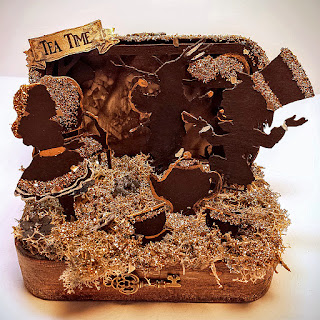
Alice in Wonderland altered altoid tin silhouttes glitter moss black white gold
Alice's Memories
Alice's Memories -- a different angle (I'm not the greatest photographer, and getting good pictures of this was really, really hard for me. It is definitely cuter in person.)

Alice in Wonderland altoid tin
Alice's Memories -- Outside of tin

I started by painting the tin a cream color, then when it was dry, used a dry brush to add a some light brown acrylic paint, then painted on a layer of DecoArt's One Step Crackle. Once that was dry, I went back with some darker brown and rubbed it into the crackled parts to make it look aged. I glued a few images to the outside of the lid, and added a couple of tiny keys for more embellishment.

For the inside, I painted the chipboard figures and chipboard props black, then added white, gold, and glitter highlights. The background in the lid of the tin is from a scrap of some photorealistic scrapbook paper I had. I used two of the chipboard frames from this set (the mushrooms in the back, the Cheshire cat in front of that) painted black and glittered, separated by pop dots so they'd stand out more. I glued crumpled tissue paper inside the base, glued some moss over that, and then decided where to place the figures and glued them in place. On a few of the figures, I cut a toothpick in half and glued to the back and stuck that down into the moss/tissue paper to help give more stability.  Finally, I dabbed some watered down glue around the moss and sprinkled glitter over the whole thing.

For my second project, I knew I wanted to do an assemblage doll piece. I've been looking at all kinds of different dolls and figures on Pinterest lately, and I just really, really wanted to try one.
Alice Doll, front

Alice Doll, front, closeup

Alice Doll, inside -- it says "It's a friend of mine, a Cheshire Cat," said Alice. 

Alice doll, inside -- the court scene for the background, with tarts and cake for decoration
I was picturing it as a wall hanging at first, although I wasn't quite sure what I was going to do for legs, but I was talking to a friend, tossing around ideas, and started thinking about putting her on a candlestick or something so she could sit on a shelf. I wasn't quite sure exactly what I was going to do, but then I was walking through Tuesday Morning, and they had these adorable little dessert bowl type dishes -- a small bowl on a pedestal, not very tall, and I thought it would make a perfect base, resembling a skirt or dress. So I picked up one of those, and then found some Tattered Angels Plain Jane's Stained Glass paint over on the craft aisle (still at Tuesday Morning):

Glass dessert dish and Plain Jane's Stained Glass Paint for creating her base


I painted the inside of the bowl with two coats (the picture there shows it after one coat) and then used some Metallic Lustre on the outside to bring out the raised design and to make the edge look gold.

For the head, I used one of the images from one of the collage sheets Alpha Stamps sent me and created a soldered square, then glued a bit of embellishment (I think it was part of an earring maybe?) in one corner. I used a bead for the neck. The wire heart was originally going to be for hanging her on a wall, until I changed direction, but it helps provide stability for the head and neck, so I just decorated it with some of the little plastic flower beads they sent me and added the "Alice's Adventures in Wonderland" graphic from one of the collage sheets.

For the tin, I painted it, then decorated the outside with some 7 Gypsies rub ons. I used some images from the collage sheets on the inside of the tin, along with one of these chipboard frames that I painted black and then edged with the gold Metallic Lustre. I used the resin heart tarts and miniature chocolate cake to decorate the deeper (normally bottom) side of the tin. The lid side has a scrap of Graphic 45 paper for the background, and then the picture, the quote, and the top hat are cut from different collage sheets, and I used this bronze stop watch

I punched holes in the tin to attach her arms, which are some little glass flower beads I had in my stash, wire wrapped together, ending in a bronze teacup and saucer charm on one arm, and a flat, round, bronze piece for a saucer on the other. On the bottom of the flat, round piece, I glued a magnet so it would stick to the tin, and then used some velcro, one piece on the top of that flat round piece and one piece on the bottom of the teacup and saucer charm, so that they stick together when she's closed, but can be easily moved so you can open the tin.

I finished her up by making her crepe paper skirt, highlighting some of the edges with the Metallic Lustre, and used some paper flowers from my stash to cover the edges of the crepe paper on the front, and a metal decorative piece to cover it on the back, because it was kind of messy looking. Here she is from the back:

Alice Doll -- back

So, those are the two projects I came up with. I actually have an idea for using some of the other collage sheet images they sent me, I just haven't had time to work on it yet. I really appreciate Alpha Stamps for letting me do this -- I had a lot of fun with it, despite being a bit nervous about it. 


Monday, May 16, 2016

Fun stuff

So, clearly I haven't stuck to the twice a week update thing. I'll work on it. For now, I thought I'd post about a class I took this past weekend at The Wild Nest. It was taught by Sandra Feazel, who does really amazing paintings. For this class, she taught us how to paint roses. 

I'm actually really happy with how mine turned out:


Sandra's example was shades of pink, but I went a different direction, color-wise. I'm not really a pink kind of girl, so I wanted to do something a little different. It always amazes me in classes how everyone's project ends up being completely different. 

Anyway, as usual, I completely forgot to take pictures of everyone else's stuff. They were all great, though. 


Wednesday, May 11, 2016

Crafty Stuff

I've actually been doing crafty, creative stuff most days lately, which is good for me -- usually I'm not very consistent with it and spend a lot more time planning stuff I want to make than actually making anything. I've been doing doodle type things a lot, like these:

That vase is pretty messed up, but I like it anyway.


I had the brilliant idea to fill in all the empty space with tiny little dots. I think it'll look neat, but it's going to take a while.


And the rest of it I'll have a big post about sometime in the near future. Here's a tiny little preview:


Thursday, April 28, 2016

Posting even though I don't have much to say

I had plans to have a really great post about how I'd cooked a bunch of stuff so I could get back to eating well. That didn't exactly happen. I did go to the store yesterday and buy stuff to cook. I bought a pack of chicken breasts I was planning to marinate and grill, but realized today that they never made it to the fridge last night, and I don't think I want to cook chicken that's been sitting out at room temperature overnight. I'll still make the veggies I was going to make, and I think I have some burger patties in the freezer and maybe some sausages, so I'll use that, but it's disappointing because the chicken just really sounded good.

Not really a lot going on here. I have a ton of stuff I need to do, and no desire to do it, but I'm sure eventually I'll get it all done.

Sunday, April 24, 2016

Art Journaling Class

This weekend, I got to hang out with art friends and make stuff and laugh and just generally have a great time.

We went to a new place out in Colleyville, The Wild Nest. If you're in the neighborhood there, stop by and check it out -- I could have easily just wandered around looking at all the stuff on the walls for an hour or more.  I'm not very good at remembering to take pictures, but a few things that caught my eye include:

This chair.


This whole area -- the peacock statue, the collaged mirror frame, the chair, the painting, the colors, all of it.
And this light fixture, plus the fun, brightly colored picture frames hanging from the ceiling.

And there was so much more. I was so busy looking at all the stuff, I just forgot to get pictures of it. It was all colorful and artsy and fun and made me want to redecorate my house.

Anyway, the class was taught by the fabulous Jenn McGlon of Noodle & Lou, who talked about finding inspiration for your art journal from old photos and books and showed us how to do a collage page, and we learned a bit about lettering from Cindy Mayfield of Yapping Cat Studios, who does really cool hand lettering. I didn't get pictures of anyone else's stuff, but a few were posted on Instagram under #artgirlsjournal.
Here's what I worked on:


Cindy taught prettier lettering than that, but this is the best I could manage. The part on the right is collaged scrapbook paper and a face image from Tumblefish Studios. Lettering was done with a Pitt big brush pen, dots added with a white Uniball Signo pen.
This girl with her camera was copied from a picture in Flow magazine -- I cheated a little, tracing her on tracing paper to get the basic outline down, but added background, frame, and the roses down the side. I still feel like it needs something, but I'm not sure what.
And the cover for my journal -- It needs something too, I just kind of glued some stuff down, and then covered some of the papers with an iridescent blue ink, just because I didn't like the way they looked. I love the ink, but I'm still not really happy with the cover. I'll figure out a way to fix it sometime.
I love being able to take classes like this and hang out with really cool people and just play with art supplies and learn new things. It's always inspiring just to be around everyone and see what everyone does.  Anyone around the Dallas area looking for this kind of class or group should go like the Art Girls Facebook page to get notifications of upcoming classes in the area.


Wednesday, April 20, 2016

General update

So, in keeping with my commitment last post to post twice a week on Wednesdays and Saturdays, here's a quick post, not crafting related.


Last night I stayed up too late reading The Murder of Mary Russell by Laurie R. King, the latest in her series of Mary Russell/Sherlock Holmes stories. It's been a long time since I've read a book that really pulled me in and I couldn't stop reading. I'm working on Outlander, but it just hasn't been like that for me. It's not even that I'm not enjoying it, but it's not un-put-down-able, although that may be as much about me as the book -- I've had trouble focusing on much of anything lately, and just not been in the mood to read, which is really weird for me.

Anyway, The Murder of Mary Russell. I can't say a lot about it because spoilers, just in case someone reads this who hasn't read it yet, but I did enjoy it. I'm not sure how I feel about the ending, but I'm trying to stay open minded and wait to see where it goes in the next one.

Other than that, not a lot going on here. The weather's been stormy, but at least we don't have flooding, and so far no tornadoes. My food choices have been less than stellar and I need to get back on track with that. I keep saying I'll do that, and then I get lazy and don't want to cook. That's really no excuse, I know I feel better when I eat better, it's just hard to get there when I'm this far off track.

So that's really all I have to talk about right now, I guess. I'll be back Saturday(ish), probably posting about the art journaling class I'll be taking on Saturday.


Saturday, April 16, 2016

Trying to commit to blogging, again...

So, clearly I didn't manage the two posts a week I talked about in my last post. Oops. That's okay, I'll just try again.

Plan going forward:  a post on Saturday, about crafting stuff. A post on Wednesday-ish about other stuff. 

So, today is a post about crafting stuff. I've made a bunch of paper flowers out of coffee filters dyed with watered down acrylic paint, just because I felt like it, and turned some of them into this colorful garland for my fireplace (I should have spaced those middle two flowers differently):

Bright, colorful coffee filter flowers
These were really simple -- I started out cutting the edges of the coffee filters into scallops to be more petal like, but then did a bunch of them without doing that, and from a distance, it doesn't make a huge difference either way. I do wish I'd darkened the edges with paint or ink for some contrast. I just stapled probably 10 filters together, then bunched up each filter individually into the middle, and then sort of fluffed them out. The garland is made up of pairs of those glued back to back with bakers twine in the middle of them. Super easy.

I carved a new stamp:


Heart border stamp
Carving stamps is something I can do when I need to be at the computer, but am not actually captioning programs -- like in the time when I'm waiting for a show to start. It's easy to just stop when I need to start captioning, I don't feel like I'm losing my place or anything, I can just pick back up the next time I have a break.

And I've been adding things to the Zazzle store I started. Zazzle is a print on demand (POD) site -- there are quite a few out there, Society6 and Cafe Press are two others you may have heard of. I uploaded some art to Zazzle and to Society6 just to see how they work, and I've already sold some things from Zazzle. It's not going to make me rich, but if it brings in a little extra money, that would be nice. It's harder than it used to be for me to get overtime at my real job, so I'd be really happy if I can find some ways to have some extra spending money, especially if I can earn it doing things I like to do and would probably do anyway, and that's basically what this is -- the types of stuff I'm uploading is stuff I would have done anyway, now I just go a bit further with it, scanning it into the computer, cleaning it up in Photoshop some, and then uploading it to Zazzle and putting it on different products. Some of the items available are:

http://www.zazzle.com/red_yellow_blue_abstract_paint_monoprint_design_wrapping_paper-256614816473931127?rf=238549736070505434
Wrapping paper

Pillows
Bags

And tons of others too -- some of them don't work so well with this kind of art work, but I hope to continue adding more options and more designs over time.